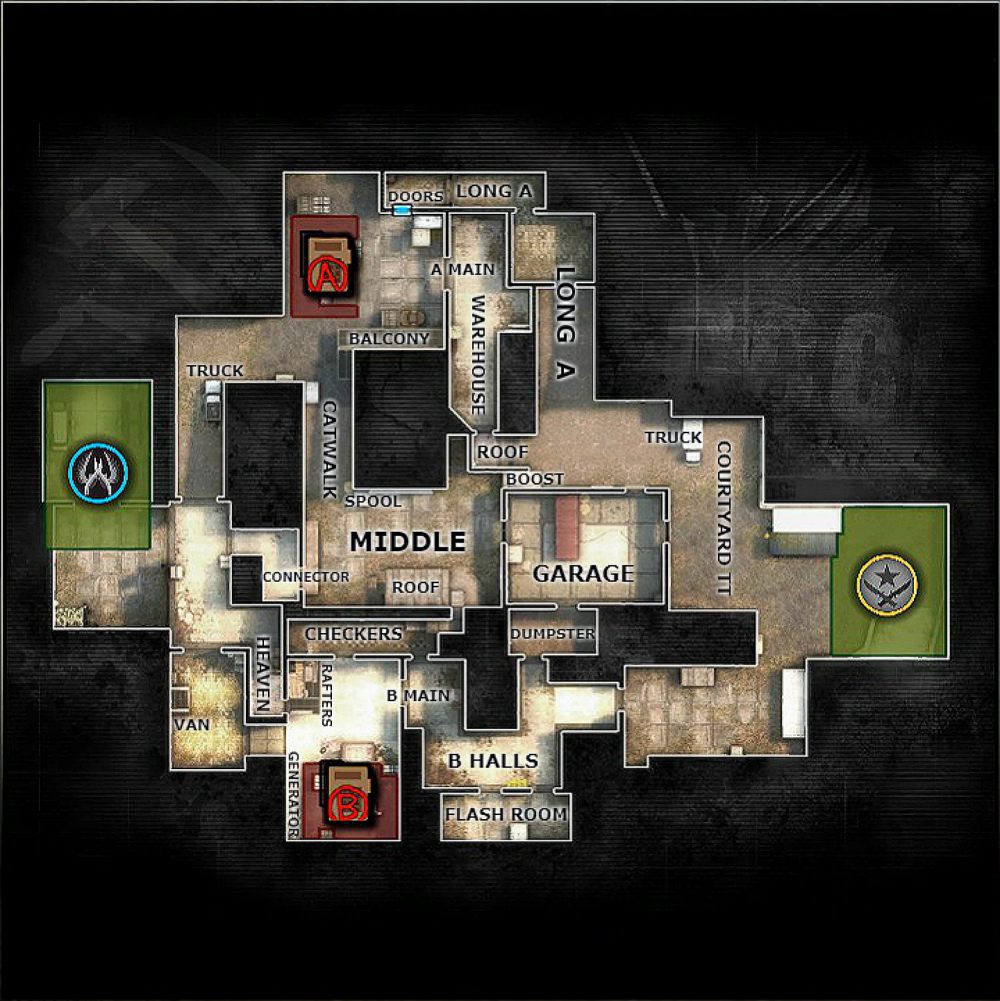
Control of these three areas is the basic task of both teams.
To achieve it, the players must use many smoke grenades and flash grenades.
A very simple and effective throw.
It will reduce the sight of an enemy assaulting through the garage.
You should perform the throw with theLMBwhile aiming at the white plate lying on the ground.
It will create a good smoke cover.
Position yourself in the corner, between the building and the car.
Aim at the point marked in the picture and throw with theLMB.
The grenade will explode directly in the passage between the hangar and the spot where bomb A is planted.
It will completely reduce the sight of enemies inside the building.
Stand in a specific place on the platform and aim at the point marked in the picture.
The throw must be performed after making a step forward.
The grenade will explode in the entrance, from the warehouse side.
It will limit the sight of players trying to enter to the point B.
A throw that it’s possible for you to perform at the Terrorist’s respawn point.
Once you will reach the white stripes crossing you must jump and release theLMB.
The throw isn’t easy - you will need to practice a bit.
A perfect throw completely reduces visibility for everyone at the passage from the Counter-Terrorists side.

Because of that, they will see next to nothing at the center of the map.
Position yourself at the entrance of the garage, from the Terrorists side, and move to the jamb.
Aim at the point marked in the picture and throw the grenade with theLMB.
Jump to the higher level next to the fence and move as far forward as possible.
Then aim at the marked point.
You must perform the throw withLMBduring a jump.
You might need a few tries to find the right time.
Properly performed throw will completely blind players looking from behind the white crate in the middle of the map.
Position yourself in the shown place and move as close to the white crate as possible.
If the windows are still in one piece, you must break them first.
Aim at the marked point and throw the grenade withLMB.
Stand in specific place and aim at the point marked in the picture.
You must perform the throw with theLMBwhile taking a step forward.
Another throw that can be performed from the same spot.
You must perform the throw withLMB.

The grenade will bounce off the crates and drop deeper at point A.
This will limit the visibility of the players looking from the side of the car and the ramp.
Unlock the grenade and throw withLMBwhile jumping.

Position yourself in the place where the thick white rope connects to the wall.
Aim at the point marked in the picture.
Throw the grenade withLMBwhile jumping.
Position yourself in the corner of the map and unlock the grenade withLMB.
Aim at the point marked in the picture and then run a few steps forward and release the throw.
You might need a few tries to find the right time for the throw.
Remember that first, you must break the glass if it’s still there.
Position yourself near the ramp and aim at the point marked in the picture.
The throw must be performed while moving forward.
Position yourself in the corner of the garage and aim at the point marked in the picture.
The throw should be performed withLMBduring a jump.
It will completely blind them there.
Position yourself in the shown place, aim at the marked point and throw withLMBwhile jumping.
The grenade will drop at point A and reduce the visibility on the right side.
Position yourself back from the wall and aim at the point shown in the picture.
You should throw withLMBwhile jumping.
Position yourself in the corner of the map and aim at the point marked in the picture.
The throw should be performed withLMBwhile jumping.
Proper throw will completely smoke the ventilation corridor.
Position yourself in the selected place, near the garage entrance.
Aim at the point marked in the picture.
The enemy won’t have time to react.
Position yourself in the shown place and aim at the marked point located on the top of the container.
You should throw while moving and withLMB.
While at point A it’s possible for you to use this wall to perform a pop flash.
Aim at the point marked in the picture and then perform a movement forward.
Then jump and release theLMB.
The grenade will explode on open space and it will blind all players looking in this direction.
Aim at the marked point while standing behind the large container on point A.
Then throw withLMBwhile moving.
The grenade will bounce off the container and explode above it.
It will blind all players at point A.
Position yourself behind the yellow barrels and aim at the marked point.
The grenade will fall on point B and blind all players in the room.
Position yourself in the shown place and aim at the marked point.
The throw should be performed withRMBwhile moving.
The grenade will drop down and explode just above the ground.
While standing behind the crates at point B, aim at the marked point.
The throw should be performed withLMBafter making one step forward.
The grenade will fly above the crates and it will explode in the air.
It will blind all players standing at the point or looking in its direction.
you’re able to use the bricks marked on the above picture to jump on the highest crate.
Simply crouch next to the crate and jump.
you might jump on the fuse box near point A.
Then you’re free to jump on the lower roof on the right side.
This is what you will see from the mentioned roof.
Ask an ally to crouch in the pointed place and then jump on his back.
Then jump so that the ally can stop crouching.
Now you’re able to easily observe the passage from the Counter-Terrorists' side.
This will enable you to get your first kill in this round.
it’s possible for you to also perform such action from the Counter-Terrorist’s side.
Ask an ally to crouch in the marked spot and use him to climb on the scaffolding.
There you might find a good spot to observe the terrorist’s respawn point.
you’re able to also climb on the roof to increase your POV.
However, you must be very careful as the enemy will be surely checking this position.
While at point A you’re free to use the containers and find yourself a nice shooting spot.
Ask your ally to crouch in the marked spot and then jump on his back.
Then jump again so that the ally can stop crouching.
Now you have a perfect view of the entrance to the hangar.
Ask your ally to crouch at this spot and jump on the crate.
Then jump on ally’s back.
After that jump on the highest crate.
You will reach a nice shooting position from which it’s possible for you to observe the whole area.
to enter the ventilation shaft you must ask your ally to crouch as shown in the marked point.
Then use his back as a stair.
It will enable you to climb on the container.
From the container, it’s possible for you to see the center of the map.
The enemy will appear there if the Counter-Terrorists are playing aggressively.
A view at the passage that leads to the Counter-Terrorists' respawn point.
There the enemy frequently takes the sniping spot at the start of the round.
You should always check this place or use a smoke grenades to blind the enemy.
The ventilation shaft is another place worth checking.
If the bars are damaged you will easily notice the opponent.
If not, then you might miss the enemy hiding behind them.
The view from the spot at the spool, from behind the white crate.
A popular shooting spot.
Here you’ve got the option to frequently encounter a player lurking for incoming Terrorists.
A position that might be helpful while trying to get your first frag.
The view from the hall before point B.
When passing to point A you must be very careful and you must check all corners.
Remember that the enemy might hide behind the crates.
Behind the containers located in the middle, there might be an enemy as well.
Remember to use smoke or flashbang grenades before entering the point.
The area behind the car and the balcony slightly above are worth checking as well.
The view at point A from the truck’s side.
it’s possible for you to take a good shooting spot here.
The view from Counter-Terrorists' passage to Terrorists' garage.
However, remember that the area is usually clouded with smoke.
The white crate with the spool is another popular shooting point.
The latter must be well secured so you can score a point.
Position yourself in the corner, backward from the wall and aim at the point marked in the picture.
When standing in the same corner you’re able to also perform a different throw.
Aim the crosshair at the marked position and throw withLMBwhile jumping.
Stand backward from the wall, next to the crates.
Aim at the marked point.
You should perform the throw while moving, withLMB.
You will create a smoke cover in the door between the passage and point B.
Position yourself in the corner of the corridor and aim at the marked point.
You should perform the throw with aLMB.
The grenade will bounce off the planks and will drop down.
The grenade will fall down and create a smoke cover from the window side.
This will enable you to pass to point B.
Position yourself in the pointed place, with your back towards the wall.
Aim at the point marked in the picture.
Position yourself in the corner and aim at the marked point.
Now simply throw withLMB.
Position yourself in the shown place and aim at the marked point.
Throw must be performed during a jump and withLMB.
The grenade will fall in the place where the bomb A can be placed.
It will create a smoke cover in the middle of the small courtyard.
The grenade will bounce off the wall and drop through the balcony.
It will create a complete smoke cover.
Position yourself with your back towards the wall and aim at the marked point.
You should perform the throw withLMB.
The grenade will bounce off the wall and fall to the long passage B.
It will limit the sight of players attempting to enter the point from that side.
Position yourself with your back towards the pillar at long B.
Then aim at the point shown in the picture and throw the grenade withLMB.
Position yourself in the corner, with your back towards the wall.
Aim at the marked point that is slightly above the wall.
The grenade will create a smoke cover near the fountain - it will enable you to plant a bomb.
Below you will find a list of suggested flashbang grenades throws that can be useful during the game.
While running aim at the point marked in the picture and releaseLMB.
The grenade will bounce off the crate and fall into the tunnel.
It will blind all players looking in this direction.
Position yourself in the corner, with your back towards the wall.
Aim at the point marked in the picture.
The grenade should be thrown while jumping, by usingLMB.
The grenade will bounce off from the wall and it will fall through the window.
Then it will explode in the air and blind everyone looking from the matrix or on the haystack.
Position yourself in the corner of the corridor and aim at the marked point.
Now simply unlock the grenade and throw withLMB.
The grenade will bounce off the planks and fall down.
It will explode there and blind all players in this narrow passage.
Position yourself in the corner of the room and aim at the point marked in the picture.
Throw withLMBwhile moving forward.
The grenade will fall into the room and blind all players looking from the center.
While standing behind the barrels in the niche at point A, position the crosshair in the shown place.
Then jump and throw the grenade withLMB.
The grenade will bounce off the wall, then fly above the narrow roof and explode slightly further.
It will blind all players looking towards point A.
It is worth mentioning that the grenade won’t harm you in any way - you could attack immediately.
The grenade will explode high in the air and it will blind all players in the area.
Ask an ally to jump on the wooden palette and crouch.
Then jump on his back and then jump again so that the ally can stop crouching.
From here you might also jump into the corridor and move slightly further.
Ask your ally to crouch more or less at this point.
Then jump on his back and get on the balcony.
When entering the long B ask your ally to give you a lift onto the high crate.
When crouching behind the small crate you are completely invisible for players incoming from point B.
This will enable you to fire much earlier than the opponent.
Ask an ally to crouch next to the wall and then jump on his back.
Then jump to unlock the ally to stop crouching.
A very popular shooting position is on the haystack, next to the passage to the matrix.
Usually, here you will find an opponent waiting for incoming Terrorists attempting to reach point A.
The narrow window is frequently used by Terrorists during the rotation from point B to point A.
Climbing on the barrels will enable you to patrol the area and immediately shoot whenever someone enters your sight.
The view at the long B from the bomb B spot.
The Terrorists will usually assault through here.
The henhouse is a good sniping position for players defending access to point B.
Always check this place when you enter the point.
If there is an enemy there, use grenades to limit his sight and eliminate him.
When the enemy appears in your line of sight you could immediately shoot and retreat to a safe spot.
The attackers might use this route to get to point A.
After shooting you might immediately retreat to a safe spot and alarm your team.
The spot behind the fountain at point B is a very popular sniping position.
It provides a view at the tunnel at long B.
After shooting you might immediately hide behind the object.
The shooting position at the top of the tower, near Terrorists' respawn point.
Here you will have a very good view at the center of the map.
The shooting position behind the cart enables you to shoot and immediately hide from the enemy.
Here you’re able to wait for the enemies running through the passage.
The shooting position in the lower terrain enables you to crouch and hide behind the front garbage container.
Here you will have a very good visibility of the whole passage that leads to point A.
The shooting position behind the pillar, in the middle of Terrorists' map.
Here you’re able to observe the passage towards point A and the passage below.
This site is not associated with and/or endorsed by the Valve Corporation or Valve Software.
All logos and images are copyrighted by their respective owners.
