You must now approach this cell (first one from the left) and scan it.
1Trophy 1The trophy is behind the locked gate.
Use a remote controlled batarang in the quarantine area and send it towards the electricity near the ceiling.
Once you’ve electrified the batarang make it crash through a window near the exit from the room.
Send the batarang to the lower level and hit a fuse box with it.
You may now enter the new room.
The trophy is near the stairs.
2Trophy 3Unlock the side area by following the instruction from the description or trophy #1.
Use the stairs to reach a room on the upper floor.
You must solve a riddle here and your objective is to turn off all question marks.
3Trophy 3Find a door to the side area and use a ventilation shaft.
Stand near a weakened wall, directly behind one of the five Riddler’s robots.
After you’ve succeeded go back to the previous room to take the trophy from the cage.
4Trophy 4Find a hitch in the backstage area, use your batclaw on it and start pulling.
Use the same gadget for the second time to grab the trophy.
5Trophy 5Use the remote electrical charge so that the Poseidon statue starts moving.
Throw a batarang to get to light the right green arrow.
Make the statue start rotating again and wait for it to get to the A letter plate.

6Trophy 6Use an explosive gel on a weakened wall to the north of the cage with the trophy.
Enter a new room and stand on a pressure plate.
You may now collect the trophy.
7Trophy 7Use the remote electrical charge to unlock the room with the secret.
You must solve a riddle here.
The objective is to use the remote electrical charge on the nearby generators in the correct order.
You may now pick up the trophy.
8Trophy 8Check the area to the east of the secret to find a pipe with hot steam.
Use freeze blast on this pipe and make your way to the upper platform.
Here you must begin by using your disruptor on a weapons crate to make it sabotage it.
Now use a voice synthesizer on Riddler’s robot and order it to check the crate.
The robot should be destroyed and a cage with a trophy will open on the upper level.
9Trophy 9Use a remote electrical charge to raise the gate and stand on the first pressure plate.
Choose a line launcher and activate it.
Land on the second plate, turn around and repeat these steps to get to the left third plate.
You may now use a batclaw to grab a trophy from a cage on the wall.
2Riddle 2Check the south-western part of the backstage area to find a closed gate.
Open this passageway using a voice synthesizer (Harley’s voice).
Enter a small room and scan a Joker altar prepared by Harley Quinn.
Scan a poster seen in a glass display.
You must choose correct colors for them.
The correct combination is (starting from left) blue, green, red and yellow.
Take the trophy from a newly opened cage.
11Trophy 11Go to the back of stage A and use a grappling hook to reach an upper ledge.

There are two active sentry turrets under Batman.
Use a remote hacking devicle to temporarily disable one of the turrets.
Quickly get to the active turret and perform a sabotage.

Finally destroy the hacked turret.
you could now pick up the trophy.
12Trophy 12Find a big robot at the back of stage A and attach yourself to it using a batclaw.

Start pulling to get to uncover a generator.
You must now begin using remote electrical charge.
The objective is to overload the generator so that it explodes.
All that’s left to do is to locate an opened cage and pick up the trophy.
13Trophy 13The trophy is in stage B of the studio.
Find a control panel near the roof and use a remote hacking gadget in it.
Input the IMPELLER password.
14Trophy 14Find a grating on the ceiling and pull yourself towards it using a grappling hook.
Once you’re in a new area activate the line launcher.
When you’re close to a new wall jump on the rope of the line launcher and turn around.
Look up to locate two pipes and seal both of them using freeze blasts.
Get to the upper balconies and use them to reach a side room with a trophy.
15Trophy 15Find a grating in the floor and use it.
Once you’ve reached the lower area look around to find two mines.
After you’ve destroyed the mines perform a slide here to reach a small room with the trophy.
You must detonate the gel when the panel gets close enough to a weakened wall.
Once this is done you only have to glide to a small ledge to get the trophy.
17Trophy 17Reach the southern room of stage B and stand on a pressure plate.
Choose a remote controlled batarang and throw it a western ventilation shaft.
Once the batarang is in the western room aim it at the green question mark.
Hitting the question mark will unlock a cage containing a trophy.
18Trophy 18Reach one of the southern room of stage B.
Once the sphere has dropped to the lower level approach it to take the collectible.
Use the shaft to get to a small room.
Turn around and throw a remote controlled batarang inside the shaft.
You may now go get the trophy.
Correct order for the first trial - blue, green, red, yellow.
Second trial - yellow, green, blue, blue, yellow, red.
Third trial - green, blue, yellow, red, blue, red, yellow, green.
Once you’ve done that you will be allowed to take the trophy.
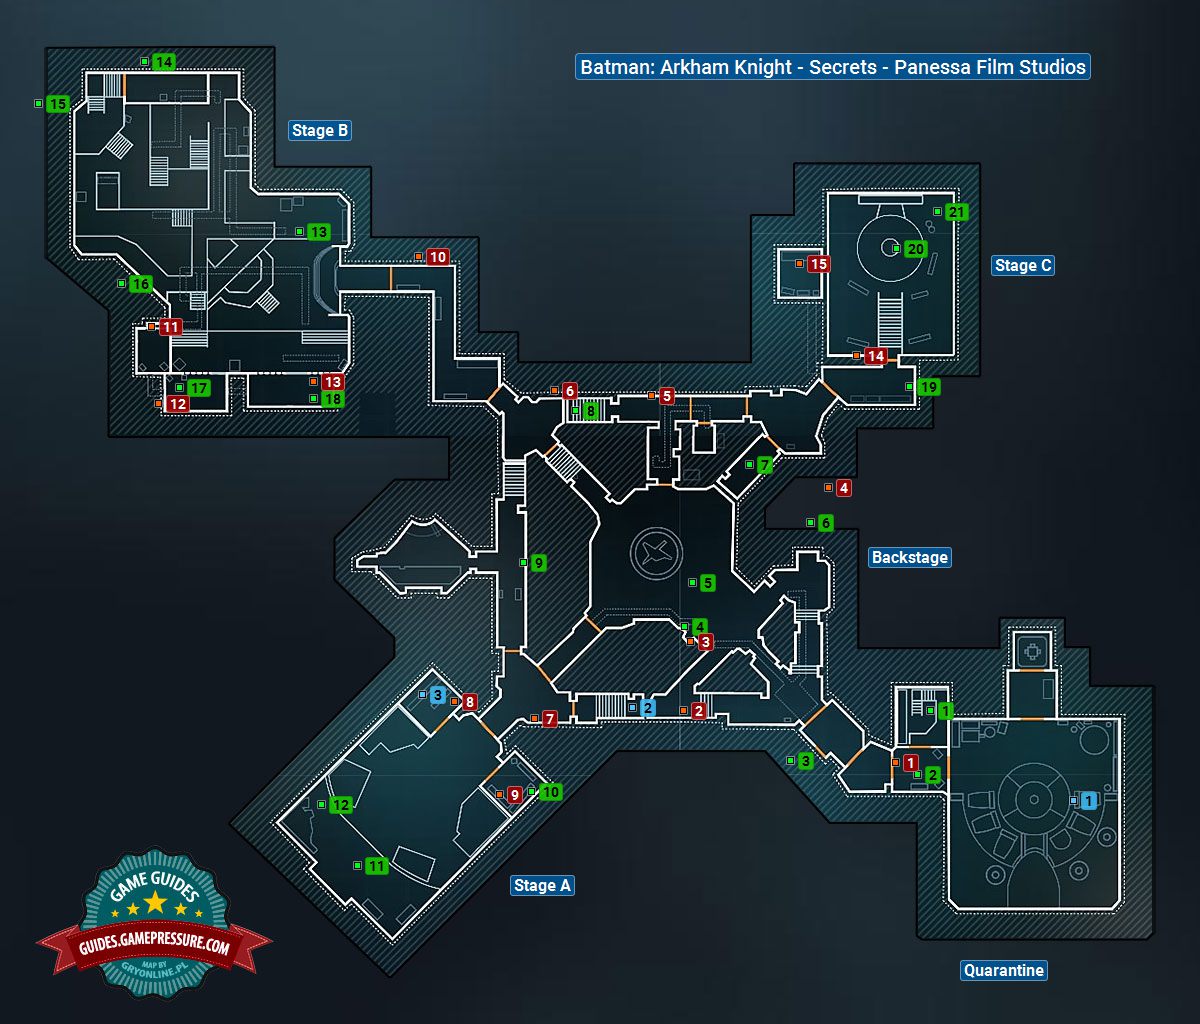
On this page of our guide toBatman: Arkham Knightwe have prepared a map of Panessa Studios.
The map shows all the secrets and collectibles that can be found in this district of Gotham.
The above screenshot presents the map of the interior ofPanessa Studios, i.e.
one of the main locations onBleake Island.
You should focus on finding secrets only after completing the main taskStop Harley Quinn from kidnapping infected Jokers.
This site is not associated with and/or endorsed by the Warner Bros Interactive Entertainment or RockSteady Studios.
All logos and images are copyrighted by their respective owners.
