guides
Last update:22 August 2017
Your Base Develop your economy and increase the number of Barracks.
You’ve got a lot of resources nearby.
verify to field a large force of SCVs and several turrets inside the base for anti-air purposes.
Northern entrance Build at least 2-3 bunkers in this area and an AA turret.
This will enable you to laugh in the face of most Zerg assault groups.
This also the spot where the main Zerg assault is launched in the last minutes of the mission.
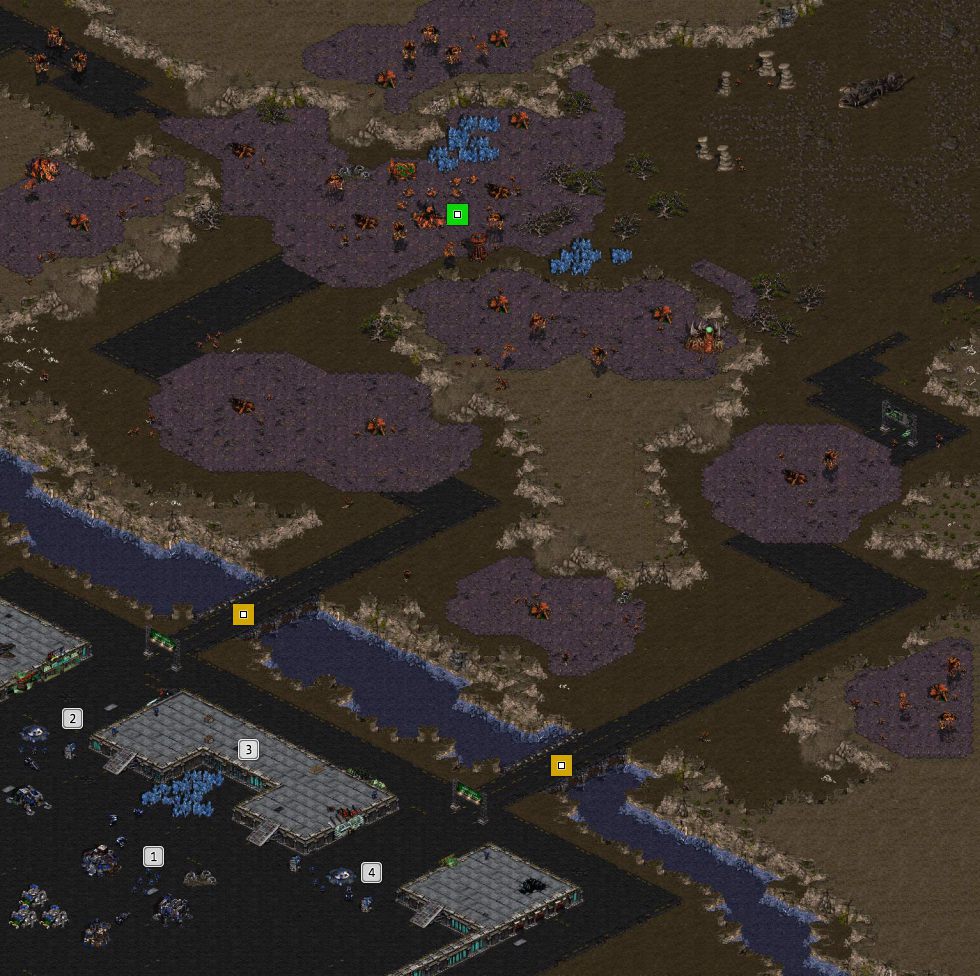
Platform between the entrances A very useful position, although you cannot build here.
Place some Marines here, so they can attack the Zerg below and protect the area from air threats.
Southern entrance Fortify by building some bunkers and towers.
The Zerg will usually favor the northern entrance, but you cannot keep this position unguarded.
Bridge All Zerg forces will have to cross these two bridges.
you’re free to set up mines to thin out larger groups of Zerglings and Hydralisks.
Smaller groups can be wiped out completely if the mines are set sufficiently apart.
Main Zerg Base That’s where the Zerg assault groups are produced.
The base is heavily-protected - it has numerous turrets and a large enemy garrison.
Frankly, it’s better if you focus on defense.
Check out our walkthrough to mission 3 in Terran’s campaign:
Survive for 30 minutes.
Not only the Confederation consider you an enemy, but they still don’t act against the zerg.

The colony on Mar Sara is threatened by an attack of a large alien force.
However, the Sons of Korhal want to help you.
According to the Confederacy, accepting help from them means cooperation with terrorists but human lives are more important.
In this mission, you have to stay put and fortify your position.
You have enough raw materials.
You are situated inside a city which can be accessed by two narrow passages.
The first pop in of wave is a land attack with several Zerglings.
With time, they become more numerous and are eventually joined by Hydralisks.
The second sort of wave involves Mutalisks, flying zerg units.
Start by repairing the eastern Bunker and the new unit, the Vulture.
It is the same hover bike that Raynor used in the previous mission.
Having been enhanced, it can plant landmines, but for the moment, focus on the economy.
In the meantime, build Supply Depots inside the base.
you’re free to also use them as walls.
However, it will be for the best if you build additional Bunkers at your base’s entrances.

Once you’ve built extra Bunkers, erect one or two Barracks to increase your infantry production.
Then, focus on building Missile Turrets in your base.
At this point, this is your only anti-air air weapon aside from Marines.
Although groups of Mutalisks won’t be numerable, their attacks can cost you a lot of footmen.
The only unit available in this mission is the aforementioned Vulture.
It is cheap and costs only 75 crystals, and it can be repaired with SCV.
This quick vehicle, somewhat resembling a futuristic sport bike, launches grenades at short range.
It is useful against groups of enemies, especially Zerglings that have little hit points.
you might also expand the Factory.
It is where you will develop additional technologies for the units trained in Factories.
The most interesting technology for Vultures is the possibility of planting hidden Spider Mines.
From this moment on, you’re able to place up to three such mines.
Only an enemy capable of detection can spot them.
If a hostile gets close, the mine activates, runs up to the enemy, and explodes.
Place several such mines at a distance from each other in front of the bunker line.
you’re free to also go a step further - there are two bridges outside of your base.
The zerg have to cross them.
After an enemy attack, you’ve got the option to place mines on these bridges.
In this way, the next wave will be significantly weakened before it attacks your position.
The most difficult part of the mission is surviving the last 5 minutes.
First, you will be attacked by a large group of Mutalisks.
Send Marines to the sectors that have the least Turrets.
Then, prepare for great groups of the zerg attacking both defensive lines.
If you placed enough units in the Bunkers, no enemy shall break into your base.
The only thing left to do is wait until the time runs out.
This site is not associated with and/or endorsed by the Blizzard Entertainment or Blizzard Entertainment.
All logos and images are copyrighted by their respective owners.
