After you take the first stairs, turn left, defeat the dog and the pirates.
The Pharros' Lockstone is on the ground.
After you activate it, all of the “monkey” demons hide in the caves and the houses.
Lever (the ship) the lever that summons the ship and opens the way to the boss.
Lucatiel of Mirrah
Gavlan On the upper floor.
After you have exhausted all of the dialogue options, he moves to Majula.
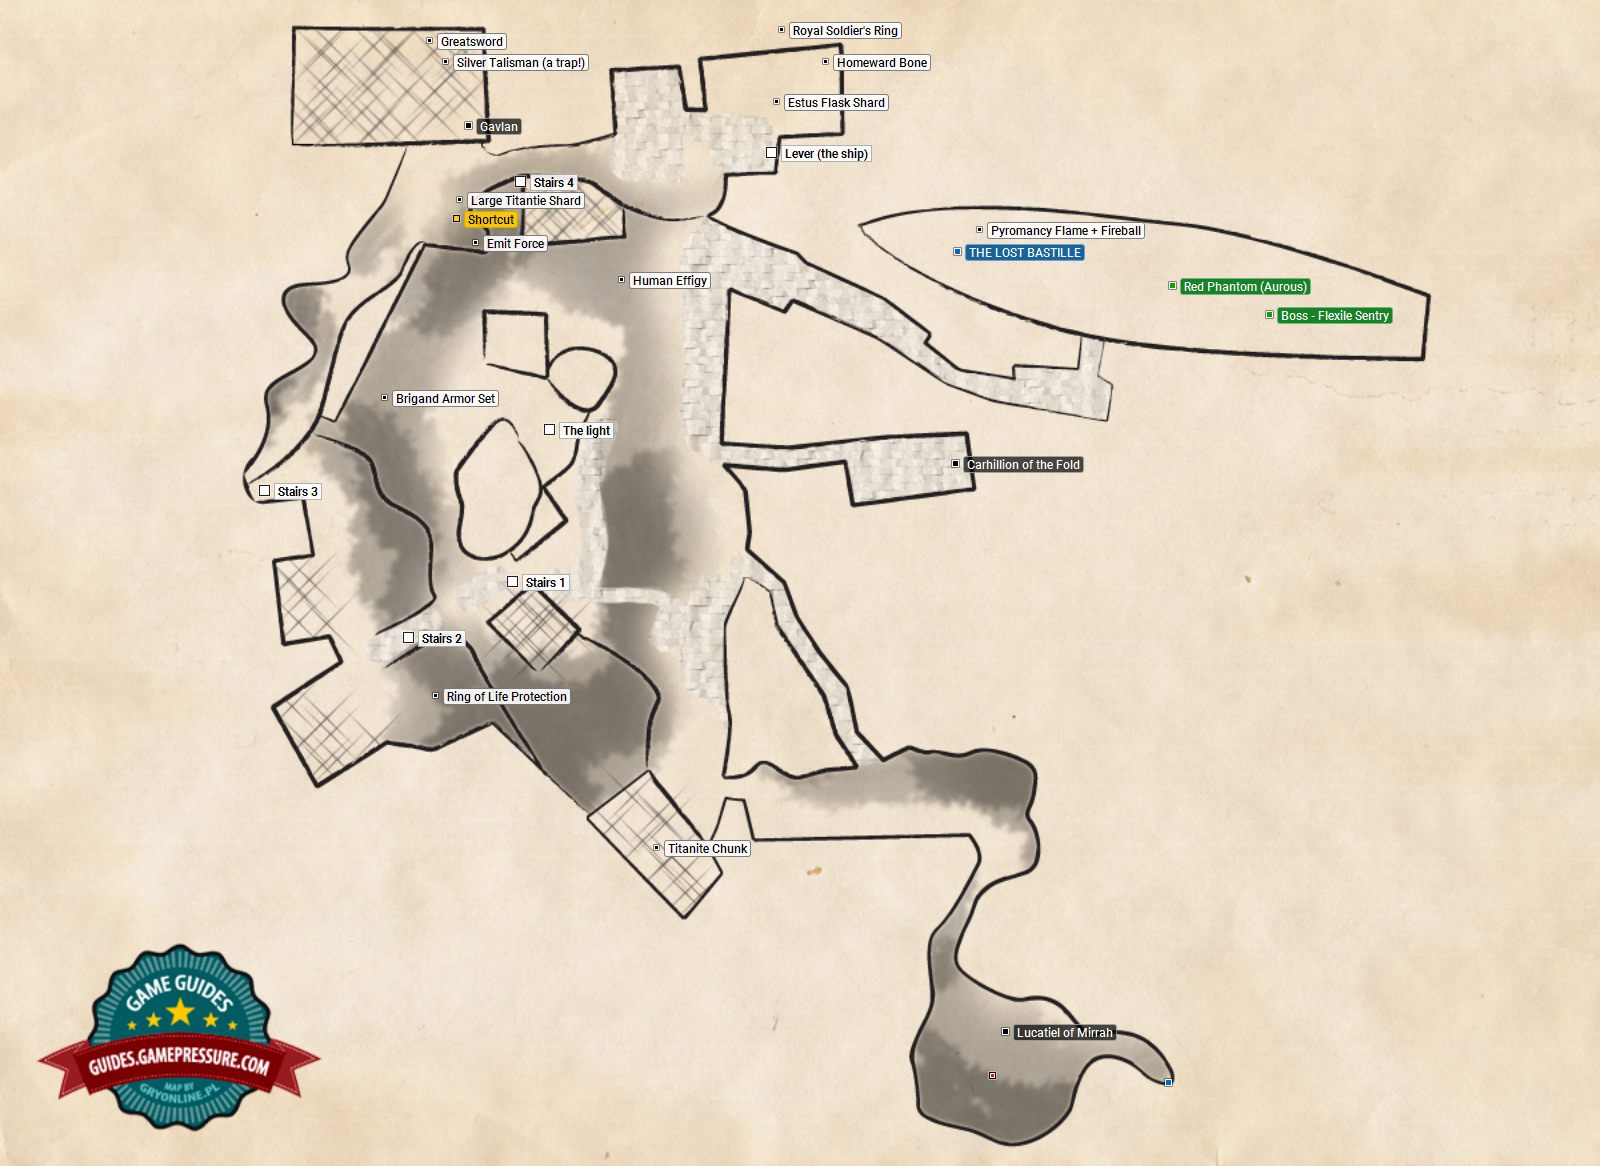
Shortcut On the chain will initiate the gate.
Brigand Armor Set Brigand Armor + Bandit Axe.
In the chest on the right side of the building, opposite the light switch.
Ring of Life Protection After you have taken the first stairs, enter the building on the left.
Greatsword The metal chest on the upper floor
Silver Talisman (a trap!)
The item is in the wooden chest, on the upper floor.
Homeward Bone You reach here from the chamber in which you pulled the lever (the ship).
Estus Flask Shard In the building under the lever (the ship).
Royal Soldier’s Ring In the building that you found the Estus Flask Shard.
The items are in the chest.
Red Phantom (Aurous) It appears only once per game (starting with the NG+).
After you defeat him, he can drop a fragment of the Aurous Armor (the visible one).

Boss - Flexile Sentry Under the deck.
THE LOST BASTILLE the switch takes you to a new location.
Go straight ahead and enter the building on the left side, just behind the bridge.
Watch out for flame arrows fired by an archer on your way there.
After reaching the building, stop by the stairs, as you will fight three bandits here.
Go upstairs and pick up aTitaniteShardfrom a chest.
Afterwards, get on a wooden platform, defeat the enemy and collect the soul.
Go down and through the bridge, defeat another bandit and an archer and continue towards the land.
On you left side, in the water, you will find a soul and aLifegem.
Collect aDarkPineResinfrom the nearest building.
Go along the platform and enter the building through the hole in the wall.
Inside, you will encounter a new pop in of enemy, a monster called Bloathead.
After the enemy is dealt with, enter the building and collect anIronArrowlying behind the chests.
Go back to the place where you’ve fought the three bandits and climb up the stairs.
Halfway through the stairs turn to the right and engage the knight and his dog.

You have to be extra careful about the archers standing on the platform above you.
Afterwards, enter the building on the square.
Inside, you will encounter a group of three enemies, each one equipped with two swords.

initiate the chest and take aRepairPowderand aTitaniteShard.
Defeat the two archers outside and jump down.
Get back to the stone stairs.
Enter the building on the opposite side and climb up the stairs.
Defeat the enemy and approach the door.
There’s no point in searching the nearby buildings, as there’s nothing hidden inside of them.
Afterwards, lure them out with a bow or a crossbow.
There’s aLonesomeGavlanmerchant by the window - you’ve got the option to buy poison-neutralizing antidotes here.
He’s a rare punch in of merchant, because you’re able to sell him your items.
After you’ve finished trading with the merchant, go down and outside.
Afterwards, continue along the wall until you reach wooden structures.
Go outside and through the next stairs.
Jump on the lower ledge and collect aLifegemand aHomewardBonefrom the corpse.
Jump further down and enter the building.
You will find aFireArrowlying on the stairs, whereas below you will encounter two more beasts.
After the fight, go outside and down the stone ledge.
In the corner of the room, behind those urns, you will find a corpse with aThrowingKnifeand aFlameButterfly.
Also, bring up the chest and pick up anEstusFlashShard.
Go outside and continue to the right, in towards the buildings.
initiate the door and climb up the stairs, defeating the enemy equipped with two swords.
Additionally, on the floor you could find a sign, with which you could summonLucatielOfMirrahto aid you.
Exit to the square in front of the buildings and go down through the stairs.
On the left side there’s a building with a hole in the wall.
There are two beasts inside.
Also, there’s a dual-wielding foe awaiting you in the water.
You must act quickly and decisively, as there are archers located on both sides of the ship.
First, take out the one on the left side.
Afterwards, go to the opposite side of the ship and deal with the other one.
Now you’re free to peacefully take out the rest of the enemies on the deck.
After clearing the deck, get inside through an entrance between the stairs.
Considering that all the planks are of the same color, it can be hard to locate the hole.
Go down the stairs and through the mist, where aFlexileSentryawaits you.
Collect aPyromancyFlameand aFireballfrom the chest.
Use the navigation machine to get to theLostBastilleand unlock thesecondbonfirein this location.
This site is not associated with and/or endorsed by the Bandai Namco Games or From Software.
All logos and images are copyrighted by their respective owners.
