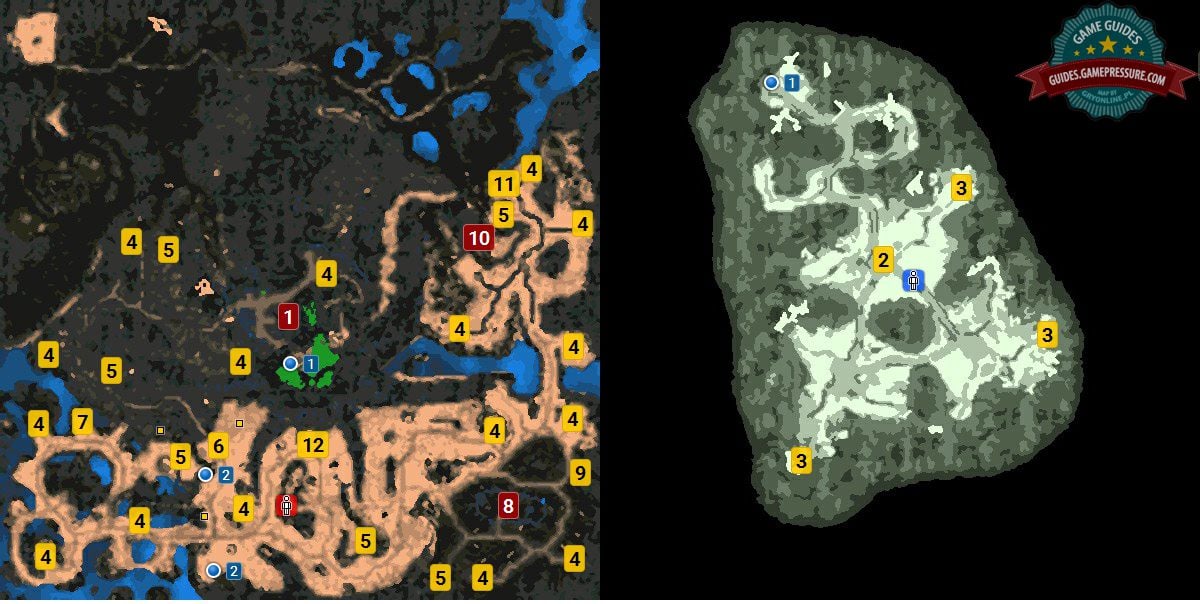
2Namtaru Temple
3Spider Obelisk
4Mine
5Refugees
6Adar-MalikYou will take control over him after the dialogue.
7ObeliskReveals a part of treasure map and teaches the spell Reveal Treasure.
9ObeliskReveals a part of treasure map and teaches the spell Reveal Treasure.
11ObeliskReveals a part of treasure map and teaches the spell Reveal Treasure.
The above map presents the second mission in the Necropolis campaign.
Your main mission is to restore your armies after the battle that you have lost in the previous mission.
At first, you do not have any resources.
All you have is the city and some tiny army.
you oughta move around the map carefully, especially at the beginning.
Your enemy are the rest of the Necropolis cities and they will also be trying to expand their control.
In this mission, there are several main and side quests.
The objective is to keep your main heroes alive.
At first, you only need to worry aboutZenda.
After you completeZenda’s Doubts,you will also gain access toLudmilla.
After you gain control overAdar-Malik(M14,6),you will also have to take care of him.
Simply put, you cannot lose a battle with any of the heroes.
You receive this quest right after you start the mission.
Your main objective is to reachNamtaru Temple.

There, you will have to follow a short path toNamtaru Temple(M14,2).
As soon as you get there, you witness a spider snatching something from one of the altars.
Do not follow, because this will be in vein.
First, you oughta “deactivate” threeObelisksin three different spots of the cave.
They have been marked on the above map with one number(M14,3).
This will complete the quest and you will be rewarded with 3000 experience points, and 3Luck/Fate.
You now need to leave the cave.
Doing this starts a short cutscene and three more quests appear in your log.
This mission starts after you completeZenda’s Doubts.
Your mission is to gather sixrefugee groupsscattered all around the map.
If you want to learn their exact whereabouts, use the map provided by us.
All of the groups have been marked as(M14,5).
For completing this quest you receive 1100 experience points.
This mission starts after you completeZenda’s Doubts.
For completing this quest, you receive 1000 experience points.

This mission starts after you completeZenda’s Doubts.
To learn the whereabouts of all the mines, use the map provided by us.
Buildings that generate resources have been marked as(M14,4).
It is impossible to seize some of the buildings.
In some cases, you will first need to seize a nearby fort or city.
For completing this quest, you receive 1300 experience points.
This mission starts after you discover, and interact with, one of threeobeliskson the world map.
What you gotta do is find all of the fragments of the treasure map.
The first obelisk is in the South-Western part of the map(M14,7).
It is being defended by a group of weak opponents.
The second treasure is unguarded and it is in the East(M14,9).
The last obelisk(M14,11)is also unguarded and it is in the North-Eastern corner of the map.
It is between two mines, more or less in the center of the map(M14,12).
Walk into the marked spot and useReveal Treasurespell.
You receive theTear of Asha, thanks to which you could build the special building in your capital.
This mission starts at the moment at which your hero discovers a rebel city on the map.
The cities in question areEnlil-Zeri(M14,8)andNabu-Shuma(M14,10).
This site is not associated with and/or endorsed by the Ubisoft or Limbic Entertainment.
All logos and images are copyrighted by their respective owners.
